Human Disco Ball Dreams Come True!
January 29, 2017
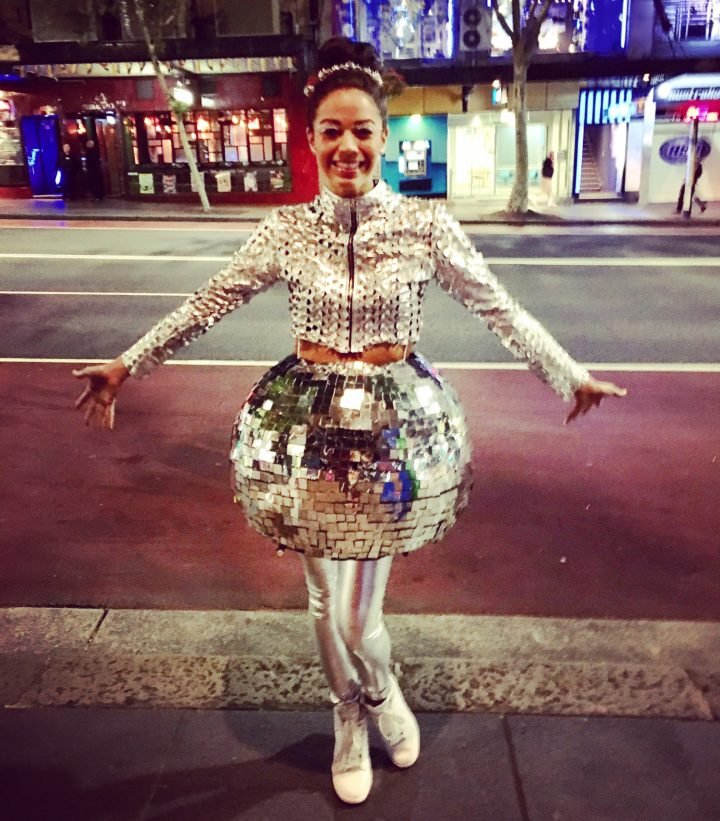
I sat in my dressing room, trying to think of what (or who) I wanted to dress up as for Halloween. I wanted to do something original, something funny, something unexpected.
And then I suddenly remembered a magazine article that I wrote yeeeeeaaarrrs ago, in which I talked about driving to an audition in Los Angeles wearing a sparkly shirt, and how the sunshine reflecting off of me created tiny reflections all over the inside of my car– turning me into a legitimate disco ball.
Hmmm. That would be interesting…. is there such a thing as…. a Disco Ball costume?
So I googled it…. and while I couldn’t find one to purchase, I did fine a few tutorials on how to make my own wearable Disco Ball. SCORE!
I was so excited to create this image. And so I set out to create the best Halloween costume ever. I learned a lot along the way… including the best kind of glue to use, the best size squares to cut, and the sturdiest way to wear the ball to protect it from getting damaged. I will lay it all out for you here. If you are so inclined to become a Disco Ball for your next costume party, or to rock out and sparkle on any ordinary day, may I present to you…
The Human Disco Ball
Materials:
36 inch Round Balloon, or even better… Inflatable Exercise Ball.
Lots of Newspaper for Paper Mache
PVA Craft Glue, or even better… PVA Wood Glue
Pebbles or Marbles (only if you use Balloon)
Plastic disposable Bowl or Pan for glue mixture
Cheap paintbrushes
Dark Grey paint
Metallic silver paper, or Mirror Stickers
Rope
Wooden Dowels cut down to size
Zip Ties
Stanley Knife, or utility trimming knife
A small trash can, or something to keep the ball from rolling while you work on it
sewing Measuring tape, or a regular Tape Measure
Permanent marker
Wooden Paint stirring stick or other disposable stirring stick


PAPER MACHE
Rip up a LOT of newspaper into small 2 inch by 6-8 inch rectangles. This can be messy and imprecise.
Inflate the Balloon or Exercise Ball. If you use a Balloon, then put some marbles or pebbles inside before you blow it up (if you use Helium) so that it doesn’t blow away. I think an Exercise Ball would be a better option, because my balloon kept deflating every couple days and didn’t keep its shape, which caused the paper mache to bend and warp. If you use an Exercise Ball, then you it’s going to keep its shape and air supply better over several days of paper mache glue and drying and painting time.
Mix some PVA Wood Glue into a plastic tub or bowl with water. Mix 1 part glue to 4 parts water, using a wooden stirring stick (or a paint stick). I found that diluted Wood Glue dries much smoother and stronger than diluted Craft Glue (Elmer’s Glue)… and you want it to be strong since you’ll be wearing it and might get bumped into at a party!
4. To paper mache, follow these instructions on YouTube! You can use your hands or a paintbrush to glue the papers down on the ball. I found that using my hands made it dry smoother. One entire layer around the whole ball takes about 1.5-2 hours.
5. After each layer of Paper mache, let it dry at least 6 hours before you add another layer.
6. Do at least 4 layers of Paper mache around your Ball. I think I did about 6 layers, but I’m not sure since I didn’t do the entire ball each time I added paper. I worked in sections. It’s A LOT of time, but just put on some music or some good podcasts and get into it.
7. After the entire ball has dried and seems sturdily covered with the paper mache (try to press the outsides of the ball and see if it bends under pressure), then it’s time to PAINT your ball with the dark gray paint.
8. After the paint has dried, it’s time to pop your Balloon, or deflate your exercise Ball. (Or just skip this step and get ready to cut your holes, which will automatically pop the balloon inside the paper mache).
9. Decide where you want to wear the Disco Ball! You can wear it as a shirt, or a dress, or a skirt (like I did). Measure the diameter of your body to see how many inches you need to make your holes. If you don’t have sewing measuring tape, you can just use rope to circumference your body and then measure the rope on a tape measure.
10. Have someone hold the ball for you while you use a permanent marker on the ball exactly where you want to cut the holes.
11. Create the holes using the utility knife.
ADD THE MIRROR CHIPS
12. Cut down your metallic silver paper, or mirror stickers, into small squares. The smaller the square, the better the Disco Ball will look, and the better it will stick over any wrinkles in the paper mache base. If the squares are too large, they will look folded and wrinkled over the areas of paper mache that didn’t dry completely smooth. Also, larger squares will make it look like a less-realistic version of a disco ball… So take the time and cut the squares down to a smaller size (roughly 1 inch x 1 inch or smaller).
13. Use diluted PVA wood glue (add very little water), or undiluted PVA craft glue (Elmer’s Glue) to stick the squares to the ball. I painted the ball in sections, and then added the squares one row at a time. If using metallic Stickers, please READ TIP below.
Tip: If using mirror stickers, it is best to remove the backing before gluing the squares on the ball. I didn’t do this (since it would be very time consuming) but I definitely lost some sparkle by the end of the night…. showing only yellow squares instead of silver (because the backing of the sticker stayed glued, but the mirror stickers fell off).
CREATING THE SUPPORT SYSTEM
Measure the width of the ball at the bottom opening. Then cut your two wooden dowels down to that size.
Have someone drill holes through each end the wooden dowels for your rope to go through
Using a knife, make small holes in the paper mache and then slip your zip ties through the holes and around the dowels to attach the dowels to the bottom of the ball on opposite sides. We used zip ties at the ends and the middle of each wooden dowel. (see photo below).
Now that the dowels are attached, feed the rope through the dowels, and drop them through the center of the ball. You will wear these ropes over your shoulders, and then you can knot the bottom of the rope at the correct height for wherever you want to wear the ball on your body!
Use the gray paint to touch up any areas that need it, like the top of the holes where you cut through the paper mache, or on the wooden dowels that are showing at the bottom of the disco ball.
Now….
WEAR DISCO BALL AND
PARTY THE NIGHT AWAY.
Other Helpful Tips and Tricks:
If you don’t want to get rope-burn on your skin (and who does, right?), it’s better to dance the night away with the rope straps OVER your clothes, not under your jacket and rubbing on your skin. Initially, I wore my clothes over the ropes because it looked better, but later discovered that the ropes were slowly rubbing away at my skin after a couple hours on the dance floor. I re-positioned the ropes to the outside of my clothes, but it was too late. The rope-burn on the top of my shoulders took a few weeks to heal and disappear completely.
Bring a high-powered Flashlight to the party, so you can shine it on your ball and increase your sparkle power. It also doubles as a great handheld flash for photos when people are trying to take selfies in a low-light party environment. Other party-goers will thank you and call you a genius. Hello, new friends. You’re welcome.
Add some more sparkle to your outfit with Silver strip eyelashes and eye crystals. Or add tiny disco balls to your hairdo.
The disco ball project also taught me some life lessons along the way. Things like: when things get bumpy, breaking your to-do list down into even Smaller tasks will help to smooth out the uneven terrain (like how Smaller mirror squares attach better than large squares to the uneven surface of the paper mache). And, creativity is often without precise directions. It requires finding your own path to your ideal destination. So dare to be BOLD, then dream BIG (without a plan), and then you can START figuring out how to make it happen. Only then will you be able to figure out the smaller steps to get from here to there. SHINE ON. You deserve to share your light. And you will undoubtedly inspire others with your commitment to unabashed self-love. I Dare you to sparkle.